Categories
- Spare Parts
- Quadcopter
- Aquaculture
- Raspberry Pi
- Video
- Components
- Gadgets
- Auto & Outdoors
- Home Automation & Security
- Audio
- Mobile Accessories
- IT
- Hobby
- Tools, Test & Mesurement
- Drones
- Drone Battery
- Spare Parts
- Remote Control Drone
- Fishing Release
- Racing Drones
- Autel EVO 2
- FPV Drone
- Mini Drone
- Drone with Camera
- Drones with FPV Display
- Beginner Drones
- GPS Drone
- Wifi FPV Drones
- Waterproof Fishing Drone
-
DJI Drones
- DJI Drone Accessories
- DJI Air 2S
- DJI Drone Spare Parts
- DJI Enterprise
- DJI FPV Racing Drone
- DJI Inspire Drone
- DJI Mavic Air
- DJI Mavic Drone
- DJI Mavic Mini
- DJI Mavic Mini 2
- DJI Spark Drone
- iFlight Racing Drones
- Mavic 2
- Mavic air 2
- Mavic Air 2 fly More combo
- Mavic Air 2 RTF
- Mavic Pro Platinum
- Phantom 3 Drone
- Phantom 4 Advance
- Phantom 4 Drone
- Phantom 4 Pro
- LED Light
- LED Lantern
- LED String / Fairy Lights
- LED Work Light
- LED Party Lights
- LED Torch
- LED Head Torch
- Household LED Light
- 12V LED Lights
-
LED Strip Lights
- Green LED Strip Light
- Power Supply
- Red Led Strip Light
- USB LED Strip Light
- Yellow LED Strip Light
- Accessory
- Blue LED Strip Light
- Neon LED Strip Light
- Rigid LED Strip Lights
- White Led Strip Light
- RGBW LED Strip Lights
- Digital LED Light Strip
- 2835 LED Strip Light Kits
- RGB LED Strip Light
- 5050 LED Light Strip Kit
- Toys
- HDMI
- HDCP Converter
- IQ4 Compatible HDMI Products
- HDMI Wall Plate Socket
- HDMI Audio Extractor
- HDMI Matrix Switcher
- HDMI Wireless Transmitter and Receiver
- HDMI Extender
- HDMI Converter
- HDMI Splitter
- HDMI Switch
- HDMI Adapter
-
HDMI Cable
- Mini Display Port
- Display Port
- Amplified HDMI Cable
- DVI Cable
- HDMI to VGA Cable
- HDMI to Micro HDMI Cable
- HDMI to DVI Cable
- HDMI to Mini HDMI
- Premium High Speed HDMI Cable with Ethernet
- High Speed HDMI Cable with Ethernet
- Hybrid Fibre Optic HDMI 2.0 Cable
- HDMI 2.0 Cable
- 8K HDMI Cable
- 4K HDMI Cable
- Hybrid Fibre Optic HDMI 2.1 Cable
- Media Player & Set Top Box
- Arduino Projects
- Power
- Battery Tester
- Transformer
- DC Power Cable & Connectors
- Solar
- Switchmode Power Supply
- AC Power Cables, Plugs and Sockets
- Powerboard and Adaptors
- Travel Adapter
- Battery Chargers
- Batteries
- USB Charger
-
GPO & Light Switch
- Electrical Accessories
- Circuit breaker & Timers
- Distribution Box
- Plug Base Socket
- Weatherproof Socket
- Black Light Switches
- Clipsal Style White
- Smart Zigbee Power Switch
- Black Power Points
- Smart Zigbee Power Socket
- Slim Series
- Alpha Series
- GPO Wall Sockets
- Power & Light Switch
- Glass Series
- Smart Wifi Power Socket
- Smart Wifi Light Switch
- Switch Mechanisms
-
Power Adapter
- Extension Cables, Splitters and Plugs
- Reversible DC Plug
- Linear Type
- UPS
- Multi-voltage Power Adapter
- 14V DC Power Adapter
- 13.8V DC Power Adapter
- 3.3V Power Adapter
- 19V DC Power Adapter
- 7.5V DC Power Adapter
- Variable Power Supply
- USB Power Adapter
- 18V DC Power Adapter
- 48V Power Supply
- AC Power Adapter
- 24V DC Power Adapter
- 15V DC Power Adapter
- 9V DC Power Adapter
- 6V DC Power Adapter
- 5V DC Power Adapter
- 12V DC Power Adapter
Information
Interfacing the HX711 with a 50Kg Load Cell
Author: Aus Electronics Direct Date Posted:6 September 2019
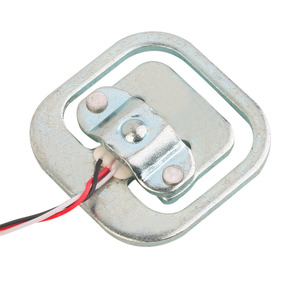
Interfacing the HX711 with a 50Kg Load Cell
Instructions on how to interface a 50Kg Load Cell to a HX711 Load Cell Amplifier
Required Parts:
2. HX711 Balance Sensor Module
3. Load Cell Straight Bar 50kg
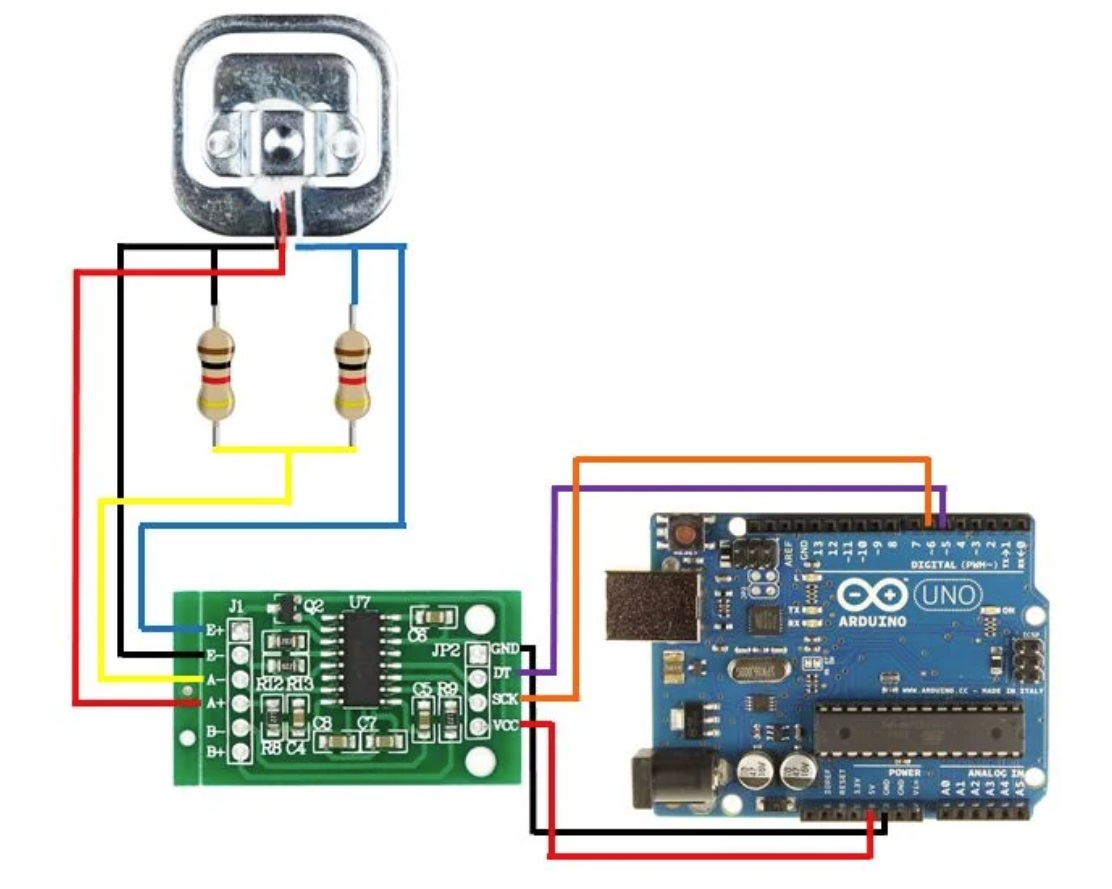
Wiring Diagram:
Library:
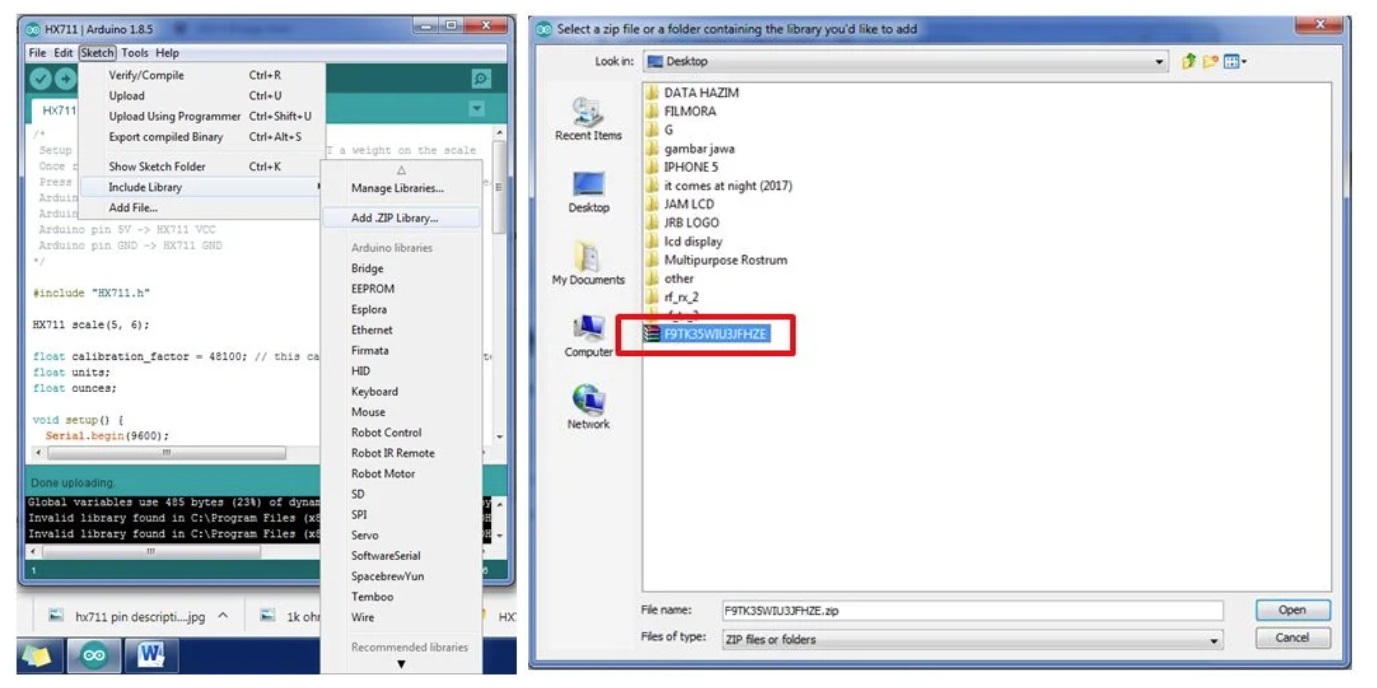
This installation requires the HX711 library. Please download the HX711 Library from here and add .Zip library to your Arduino IDE.
step 1 - click Sketch
step 2 - click Include Library
step 3 - click add .Zip Library
step 4 - select the .zip file you have downloaded
Connect the Uno Development Board to your PC or Laptop via the USB Cable.
HX711 Sample Code
Download the sample source code for the HX711 from here. Open and upload this sample source code into your Arduino IDE.
NOTE : You can change your calibration factor before uploading the code OR you can adjust it later in the serial monitor box since the code allow you to add and subtract the value of calibration factor.
Open the Sample Source Code file.
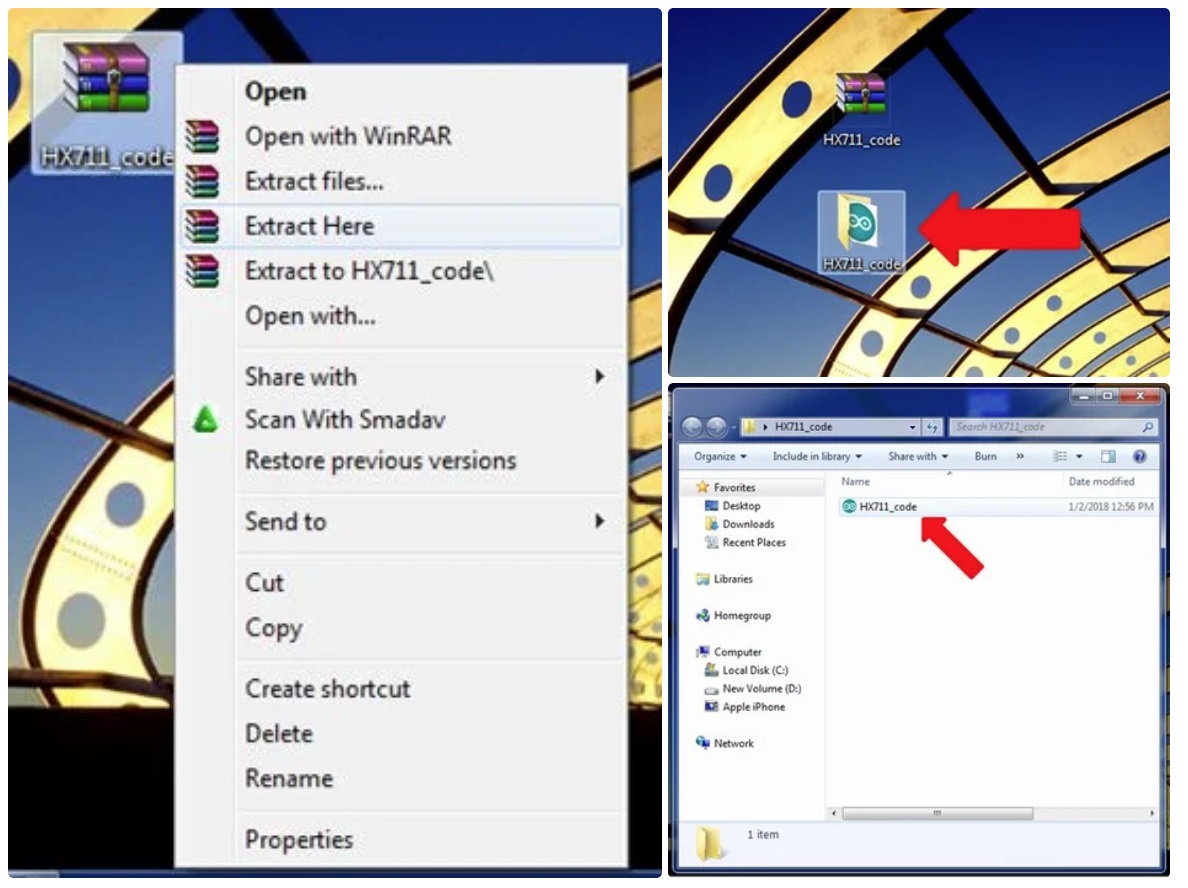
First, you need to extract the zip file. right click the zip file and then click extract here. Second, open the HX711_code file and open the sample source code.
Upload the Code to the Arduino Uno Board
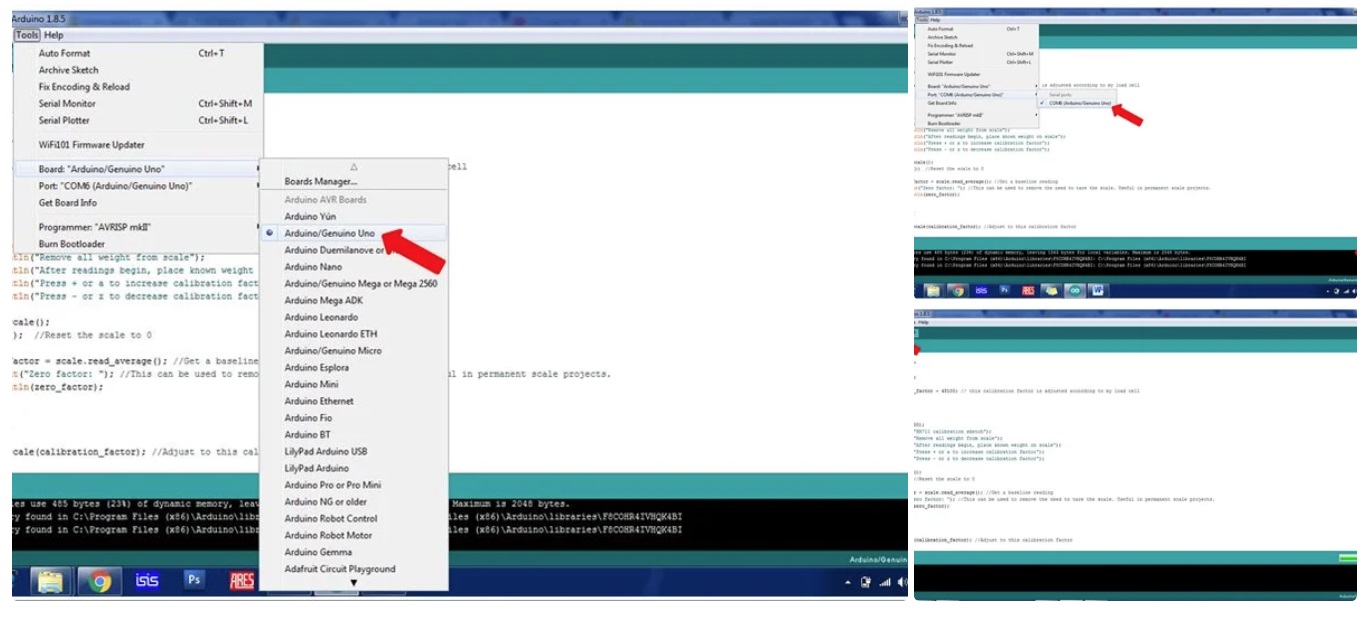
Before uploading the code, ensure to select the correct board Arduino UNO and ensure the COM Port of Arduino IDE and the USB port is the same COM Port. Then, upload the sample source code.
Serial Monitor
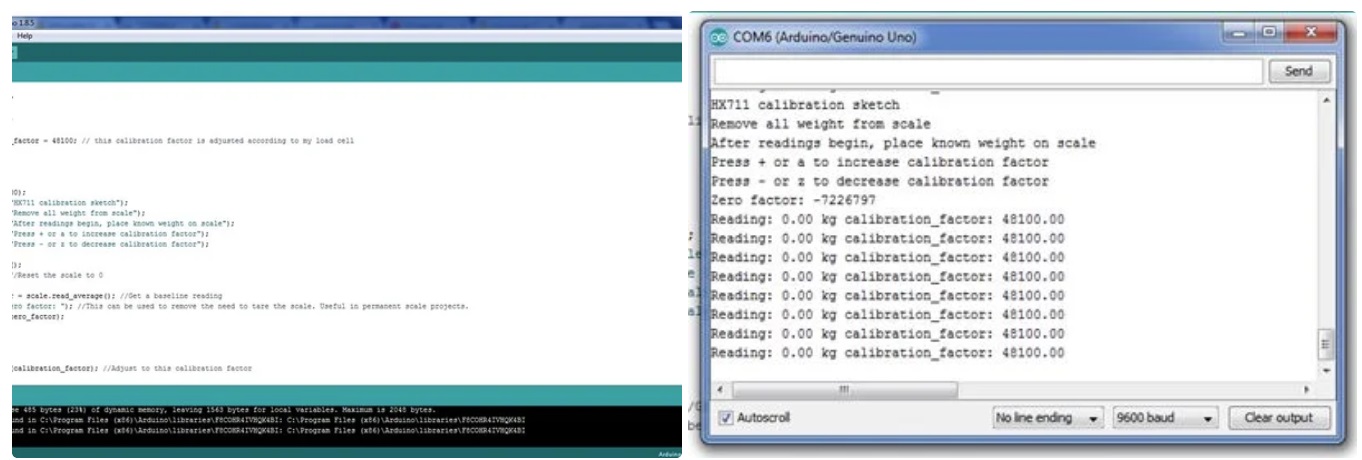
After successfully uploading the sample source code into your Arduino Uno Board, open Serial Monitor and it should display as above image.
Result:
Serial Monitor
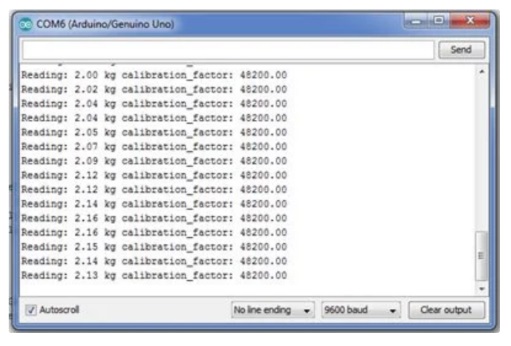
When the serial monitor shows values, it means that the interfacing between module and load cell is successful. Now, you can set your own calibration factor by adjusting the value using the '+' or 'a' to increase the value OR '-' or 'z' to decrease the value. You are only required to calibrate only once for each load cell.
Comments (1)
resistor
By: Mak Czan on 4 December 2020Hello, Can you please post a picture of the real wiring circuit. How you connected the load cell to the resistors.
